A phone pe qr code generator can help you get a business QR ready for a shop counter, invoice, WhatsApp order or website. You can use the QR inside the PhonePe Business app, or create a printable QR from your merchant UPI ID and then add order-wise verification when you sell online.
What you need before you start
Choose the route that matches how you collect money:
| Your use case | Best starting point | What the QR does |
|---|---|---|
| Shop counter, stall or reception desk | PhonePe Business QR or a static QR | Takes the customer to your merchant payment screen; the customer enters the amount |
| Printed invoice or WhatsApp sale | Printable QR made from your UPI ID | Gives the customer a scan-and-pay option wherever the invoice is shared |
| Website, booking, subscription or service order | A unique dynamic QR for each order | Carries order context such as the amount and reference, making matching easier |
Keep these details ready:
- Your active PhonePe Business merchant account or its UPI ID.
- The merchant or business name that customers should see before paying.
- A printer or a place to display the image if you need a physical QR.
- For online orders, an order ID and a way to receive a payment status update.
The QR identifies the payee. It does not, by itself, prove that an order has been paid. Always check the merchant payment record or your verification system before releasing a product or service.
Option 1: Get a QR from the PhonePe Business app
This is the simplest route when you already use PhonePe Business for in-person collections. PhonePe’s merchant solutions page describes QR standees and QR-based payment acceptance, and its help centre documents the QR section in the Business app.
Step 1: Open the merchant QR section
Why: You want the QR connected to your business merchant account, not a personal payment profile.
- Update the PhonePe Business app if an update is available, then open it and sign in to the correct merchant account.
- From the home screen, tap QR at the bottom. PhonePe’s current help instructions use this route for QR requests.
- If your version shows a profile menu instead, open the profile photo, choose Manage QR codes, and tap QR Code.
What success looks like: you can see a QR associated with the correct outlet or merchant name. Check the displayed name before saving or ordering anything.
Step 2: Save the QR or request a printed one
Why: The digital image is useful for online sharing, while a printed standee is easier for counter payments.
- Open the existing QR and use the available Share, Save, Download or Print action in your app version.
- If you need a new physical QR, tap QR at the bottom, choose Order QR, add the requested details, tap Request, and then tap OK. The exact labels may vary by app version.
- Keep the saved image at its original quality. Do not crop away the code, cover it with a sticker or place it on a patterned background.
What success looks like: you have a clear image or a QR order confirmation, and the payee name shown during a scan matches your business.
The exact button names can change as PhonePe updates the Business app. If you cannot find the QR controls, use the latest app version and open the in-app Help section. PhonePe also provides merchant support through its official business channels.
Step 3: Test the QR before displaying it
Why: A quick scan catches an incorrect outlet, a damaged print or a wrong UPI profile before a customer uses it.
- Scan the QR with a second phone or another UPI app.
- Confirm that the payment screen shows the right merchant name and UPI address.
- If you have printed the QR, test the print from the distance and angle your customers will use.
- Do not approve an order from a customer’s “successful” screenshot alone. Check your own PhonePe Business history, notification or bank record.
What success looks like: the QR opens the expected payment screen, the payee details are correct, and the payment record appears in your own merchant account after a legitimate test payment.
Option 2: Make a printable QR from your UPI ID for free
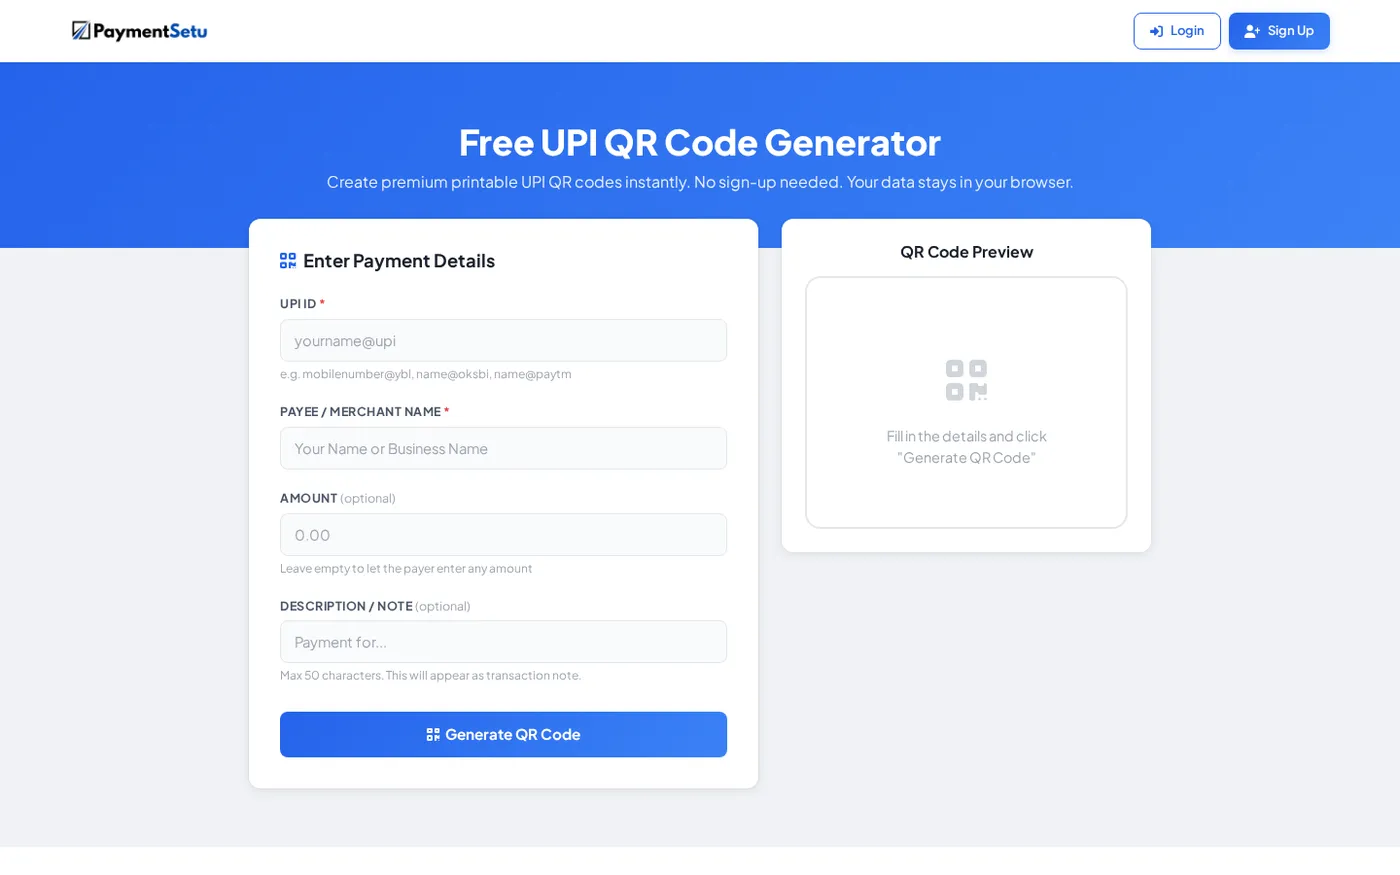
Use this option when you need a QR image quickly for a counter, invoice, menu, quotation, WhatsApp message or social profile. You do not need to recreate the QR manually: the free UPI QR code generator creates it from your UPI ID in the browser.
Step 4: Enter your business payment details
Why: The UPI ID is the destination; the name helps the payer verify that the QR belongs to you.
- Open the free generator.
- Enter the PhonePe Business UPI ID exactly as shown in your merchant account.
- Enter your payee or business name exactly as you want it recognised.
- Leave Amount empty for a general-purpose counter QR. Enter a fixed amount only when the QR is for one known price, such as a standard consultation or ticket.
- Add an optional short note if it will help the payer understand the purpose of the payment.
What success looks like: the preview shows a QR generated for the correct UPI ID, with the merchant name and any optional amount or note you entered.
Step 5: Generate, download and test the image
Why: A QR should be readable after it is downloaded, printed or compressed by a messaging app.
- Click Generate QR Code.
- Review the preview, then download the PNG or print it.
- Keep enough white space around the code. Do not stretch it unevenly or place text over the square pattern.
- Scan the saved image from another screen and scan the printed copy before sharing it with customers.
- Check the payee name on the payment screen. If it is wrong, correct the UPI ID and generate a new image.
What success looks like: the downloaded or printed QR opens the right PhonePe Business payment destination and can be scanned without manually typing the UPI ID.
The free generator is useful for a static QR. It does not turn one permanent QR into a different QR for every order. For that, use the dynamic flow below.
Static QR limits for online orders
A static QR normally points to the same merchant UPI ID each time. A payer may enter the amount after scanning, which is convenient at a counter but leaves your team to identify which order the payment belongs to.
NPCI’s UPI guidance distinguishes static and dynamic QR data. A dynamic QR can carry transaction details such as a reference and amount, while a static QR does not create a new transaction reference for each order. That is why NPCI’s UPI guidance discusses reconciliation challenges with static QR and the transaction parameters used by dynamic QR.
Use a static QR when:
- You collect at a counter and can confirm the amount with the customer.
- You want a general QR on a printed invoice or signboard.
- A person is available to check the payment record before fulfilling the request.
Use a dynamic QR when:
- Each website order has a different total.
- You need the order ID or transaction reference attached to the payment request.
- Your checkout, booking or billing system should receive a machine-readable payment status.
There is an important difference between receiving a UPI payment and verifying an order. A static QR can help money reach your merchant account, but your business still needs to match the amount, UTR and customer order. A dynamic QR plus an automated verification workflow reduces that manual matching work.
Connect PhonePe Business to PaymentSetu for order-wise verification
PaymentSetu is a payment verification service, not a payment gateway. The customer pays directly into your own PhonePe Business merchant account; PaymentSetu matches the payment to the dynamic QR or order and sends a webhook to your system. It does not hold the money.
Step 6: Connect the merchant account
Why: The connector gives PaymentSetu the merchant payment information needed to match incoming payments with your orders.
- Create a PaymentSetu account and open the dashboard.
- Choose the PhonePe Business merchant connector.
- Complete the PhonePe Business sign-in and OTP steps shown in the connection flow.
- Confirm that the connected merchant account and business name are the ones you intend to use.
What success looks like: the dashboard shows the PhonePe Business connection as ready for payment verification.
Step 7: Create a unique payment request
Why: A unique request gives your checkout or billing system an order context to match.
Choose the integration that fits your business:
- For a WooCommerce store, use the PaymentSetu WooCommerce plugin so the checkout can show a UPI payment request and update the order after verification.
- For a hosting business using WHMCS, use the PaymentSetu WHMCS module for invoice payments.
- For a custom website or SaaS app, use the PaymentSetu API to create the order and your HMAC-signed webhook endpoint to receive status updates.
Pass your own order or invoice reference and the exact amount when creating the payment request. Show the generated QR to the customer, and keep the reference in your order record.
What success looks like: each new checkout displays the payment details for that order rather than one generic QR reused for every customer.
Step 8: Confirm the webhook and fulfil the order
Why: A payment notification should change an order only after your server verifies that it belongs to that order.
- Receive the PaymentSetu webhook at your server.
- Verify its HMAC signature before accepting the event.
- Match the event’s order reference, amount, UTR and payment status with your own order.
- Make the order update idempotently, so a repeated notification does not fulfil it twice.
- Keep the PaymentSetu status and PhonePe Business payment record available for reconciliation.
What success looks like: the customer’s payment lands in your PhonePe Business merchant account, the matching status reaches your system, and the correct order is updated without manual screenshot checking.
Which PaymentSetu plan should you choose?
All plans are charged per 30 days. One credit represents one successful payment verified.
| Plan | Price | Credits | Suitable starting point |
|---|---|---|---|
| Starter | ₹399 / 30 days | 100 | Small shops, freelancers and new stores |
| Pro | ₹999 / 30 days | 1,000 | Growing WooCommerce, WHMCS and service businesses |
| Business | ₹1,499 / 30 days | 100,000 | High-volume, SaaS and multi-branch businesses |
All plans include dynamic QR, webhooks, a unified dashboard, real-time notifications and API access. See the PaymentSetu pricing before connecting your PhonePe Business account.
Verify the setup before sharing the QR
Run this checklist for both an app-provided QR and a QR made from your UPI ID:
- Scan the QR with a second device.
- Confirm the displayed payee name and UPI ID.
- Check that an amount is blank for a general QR or fixed only when you intended it to be fixed.
- Make a legitimate test payment appropriate to your business.
- Confirm the credit in your own PhonePe Business record or bank account.
- For PaymentSetu, confirm the matched order, UTR and webhook update.
- Print or share the QR only after every detail is correct.
Troubleshooting a PhonePe business QR
The camera does not recognise the printed code. Download the original PNG again, print it larger, keep the white border around it and remove glare from plastic covers. Test the print with more than one UPI app.
The payment screen shows the wrong name. Stop using that QR. Check the UPI ID entered in the generator or the outlet selected in PhonePe Business, then create or save the QR for the correct merchant account.
Customers pay, but you cannot tell which order it is for. A general static QR does not carry a unique order reference. Use a dynamic QR for each checkout, or reconcile the amount, UTR and time against your order records before fulfilment.
The PhonePe Business menu looks different. Update the app and look for QR, Order QR or Manage QR codes. You can also open the app’s Help section to check the current labels and request steps.
FAQ
Is a PhonePe Business QR the same as a UPI QR?
A PhonePe Business QR is a merchant QR linked to your business payment destination. UPI is interoperable, so customers may be able to scan it from another UPI app; they should still confirm the payee name before paying. NPCI’s UPI FAQ explains QR-based merchant integration and the merchant information carried in a QR.
Can I create a PhonePe QR without the PhonePe Business app?
Yes, if you already know the correct PhonePe Business UPI ID, you can use the free UPI QR generator to create a printable static QR. For a PhonePe-provided merchant QR or a physical QR request, use the PhonePe Business app and check the QR section.
Can I use one static QR for website orders?
You can display one static QR, but the customer may need to enter the amount and your team must match the payment to the right order. For automatic order updates, create a unique dynamic QR or payment request for every order.
How do I verify that a PhonePe QR payment is genuine?
Check your own PhonePe Business payment history, notification or bank record instead of relying on a screenshot. For online checkout, match the UTR, amount, order reference and status received by your verification workflow before fulfilment.
Does PaymentSetu receive or hold the customer’s money?
No. The customer pays directly into your own PhonePe Business merchant account. PaymentSetu verifies the payment against the order and sends the status to your system; it is a payment verification service, not a payment gateway.